Hello hello, hope you’re all doing well.
Recently, I’ve been meaning to add a plethora of data points to my Google Analytics account so that I could push my analysis to the next level.
With a classic Google Analytics account, there are so many data points available on your website that could be used for analysis that you just can not see in the default reports. Values such as the Published Date, the Author name, the amount of comments or even the WordPress categories an article belongs to are all data points that would be excellent filters to use in Google Analytics.
And so after a bit of research, I eventually figured a workflow that allows anyone with a Google Analytics account integrated with Google Tag Manager to do the same and I wanted to share this workflow in this article. So without further ado, let’s get into it.
Requirements
In terms of requirements, the most important thing that is needed to be able to follow this tutorial apart from a Google Analytics account is that it should be integrated through Google Tag Manager. This tutorial will follow the implementation with a Universal Analytics account instead of a GA4. I do not know if the steps are similar between UA and GA4 so I will let GA4 users comment on that if they decide to try and follow this tutorial.
The second requirement is that any data point you’re looking into registering in Google Analytics need to be a visible element in your page.
How to Add Published Date to the Google Analytics Behaviour Page
The first custom field we are going to add to our Google Analytics account is going to be the “Published Date“.
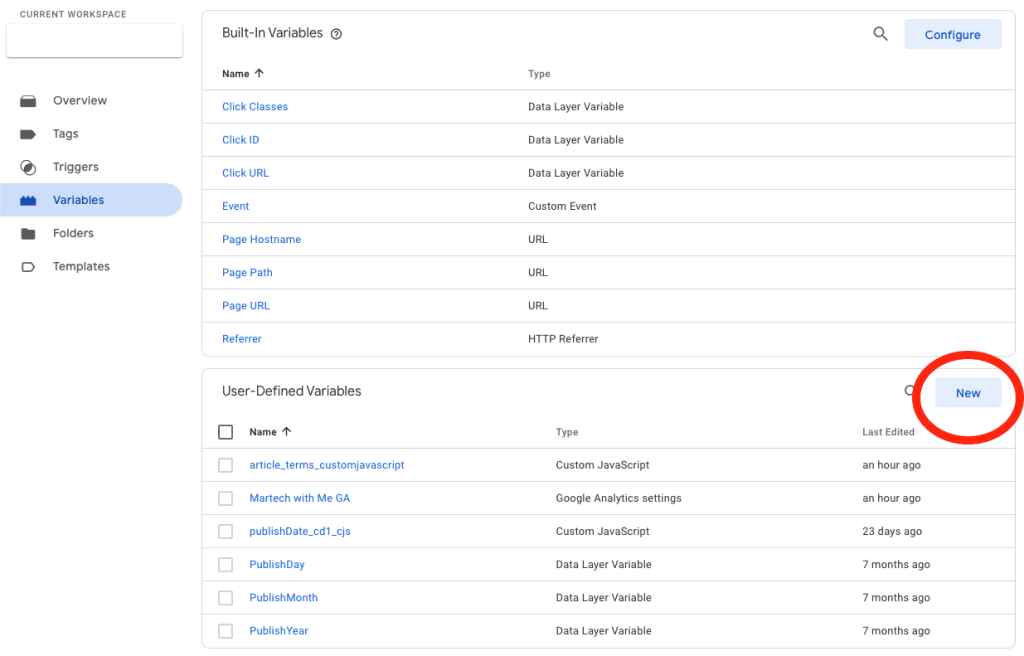
To get started, let’s head over to our “Variables” window from the Google Tag Manager interface and choose to create a new “User-Defined Variables”.
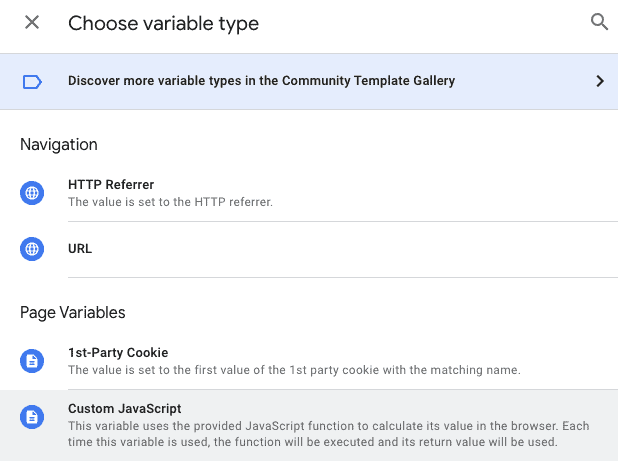
When asked what type of variable we would like to set up, find the Variable Type “Custom JavaScript” and select it.
You will then be greeted by a text window where we will be able to paste our code template.
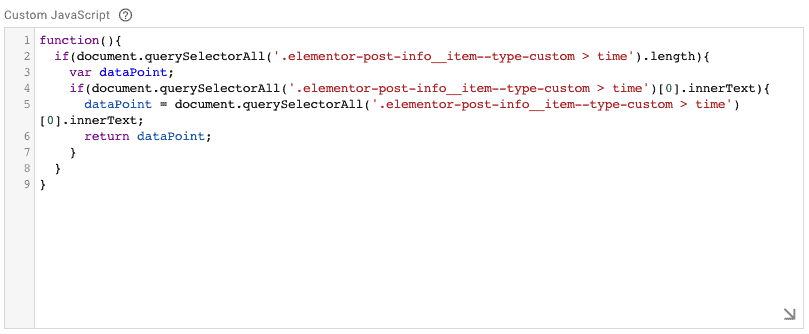
Here is the sample code that will act as the base for our GTM variable:
function(){
  if(document.querySelectorAll('ELEMENT_TEMPLATE').length){
    var dataPoint;
    if(document.querySelectorAll('ELEMENT_TEMPLATE')[0].innerText){
      dataPoint = document.querySelectorAll('ELEMENT_TEMPLATE')[0].innerText;
      return dataPoint;
    }
  }
}
There are a few things here that we need to edit. The first element we want to change is all of the mentions of ELEMENT_TEMPLATE. These need to be replaced by the JS path of your page element that we want to extract from our pages and have available in Google Analytics.
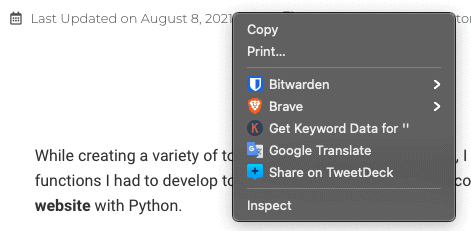
To do so, head over to your page of interest and right-click “Inspect” on the element you’re interested in extracting for Google Analytics. In my case it’s the date of publication on any of my articles:
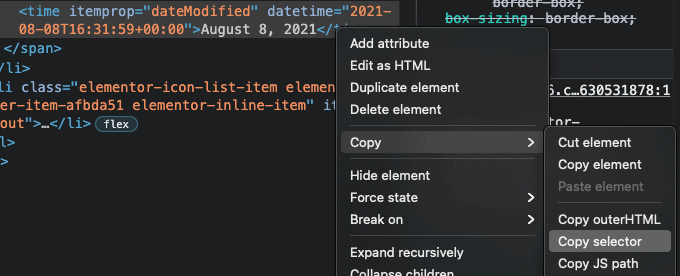
Once you have the element that you are interested in highlighted in the console, right-click on it and find the “Copy” -> “Copy JS Path” button.
With the JS path in the bag, it’s time to clean it from the unwanted parts. Here is how mine looked like:
document.querySelector("body > div.elementor.elementor-1386.elementor-location-single.post-1869.post.type-post.status-publish.format-standard.has-post-thumbnail.hentry.category-automation.category-python.category-tutorials > div > section.elementor-section.elementor-top-section.elementor-element.elementor-element-75786687.elementor-section-boxed.elementor-section-height-default.elementor-section-height-default > div > div > div > div > div > div.elementor-element.elementor-element-24f9992d.elementor-mobile-align-center.elementor-align-center.elementor-widget.elementor-widget-post-info > div > ul > li.elementor-icon-list-item.elementor-repeater-item-70fa247.elementor-inline-item > span.elementor-icon-list-text.elementor-post-info__item.elementor-post-info__item--type-custom > time")As you can see, it’s quite a big chunk of text. Fortunately, we are only interested in the absolute last selector which is after the last dot in this text block. I put it in bold above. Simply copy away the same part of your own code INCLUDING the dot in front.
.elementor-post-info__item--type-custom > timeThis is what I ended up with. Now, we can bring back this piece of text and paste it in lieu of the ELEMENT_TEMPLATE value in our Custom JavaScript function in GTM like so:
The second thing we need to specify is the name of the variable. If you intend on creating multiple custom fields for your Google Analytics instance, I suggest you pick a convention that makes sense within your GTM workspace. In my case, I suggest CJS_CD_NameOfDataPoint. CJS stands for Custom JavaScript and CD stands for Custom Dimension.
Now that we have our custom function in JavaScript, we can save it and jump on the next step of the process.
Go back to the list of your User-Defined Variables and find the Google Analytics Settings variable you must have created when setting up GA Universal Analytics with Google Tag Manager originally.
Open the variable and open the “More Settings” panel. You should see a “Custom Dimensions” option ready to be set. In my case, I already have a couple of Custom Dimensions set but yours should be blank:
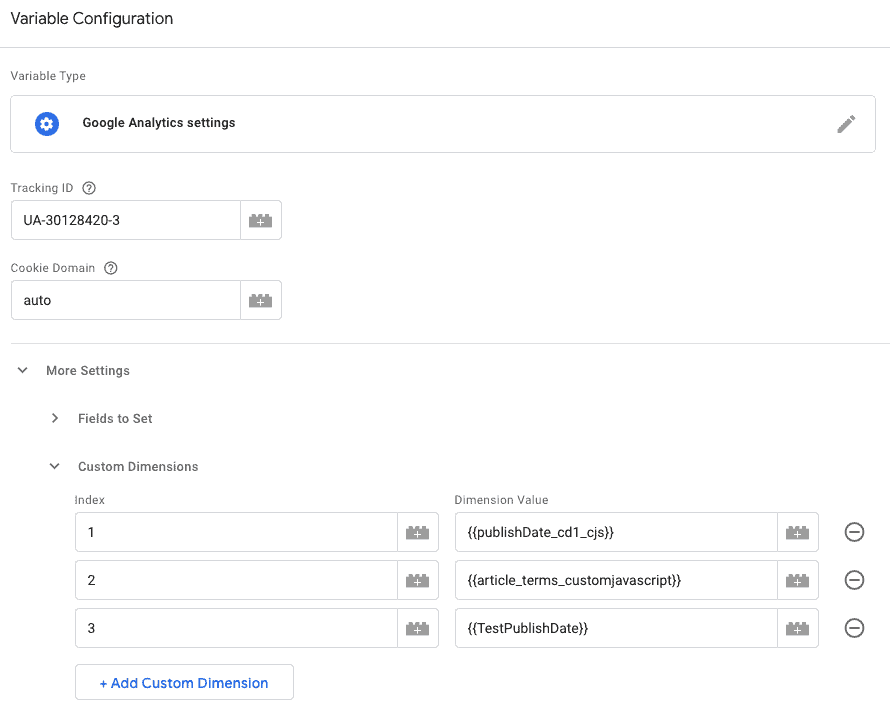
Simply click on “Add Custom Dimension“.
In the column Index, simply pick a number starting from 1. I suggest 1 if this is your first Custom Dimension.
In the column Dimension Value, click on the little brick on the right-side of the column and select the name of the variable you’ve created in the previous step.
Save the lot and that’s it for the Google Tag Manager implementation! Now, you can publish your changes and submit the new version of your GTM variables in your GTM workspace.

The next step is to tell your Google Analytics instance what’s coming for it.
Head over to your GA Admin panel. In your Property Settings, there should be a “Custom Definitions” at the bottom of the panel. Click on it and then on “Custom Dimensions“.
Once you’re there, click on “New Custom Dimension“.
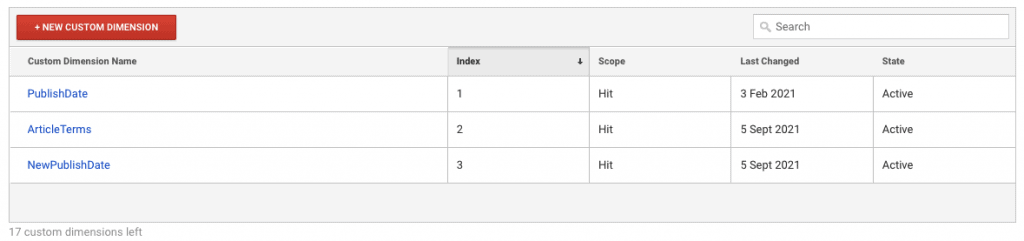
The only thing you need to do is to name your Custom Dimension. This will be the name of the filter you’re going to add to your Google Analytics views. The scope by default is HIT and is correct. You will then be redirected to another page that you can skip and click on “Done”.
The only thing we need to be careful of is that the index of your new Custom Dimension in your Google Analytics instance corresponds to the index you selected in GTM for your GA Settings’ variable. If you’ve never done this before they should both be 1 and cause you no trouble.
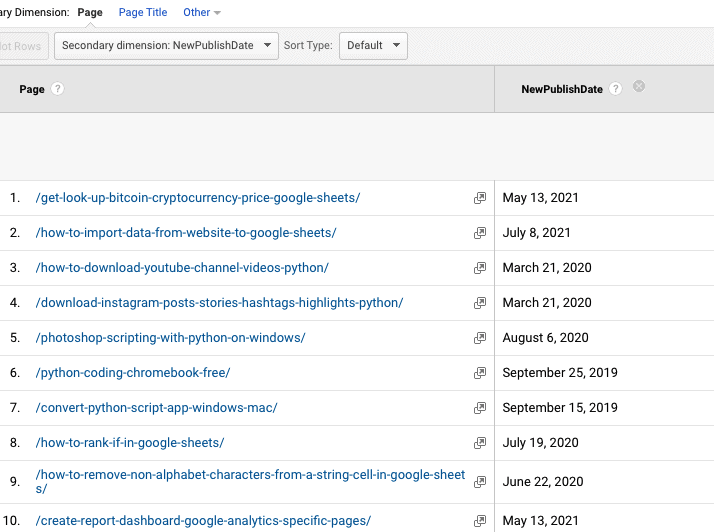
And that’s it! Now you can go on your Behaviour page, in your “All Pages” report and add a secondary dimension where you will be able to see your newly added dimension!
Please not that these changes are not retroactive. E.g you will not be able to see the data from your new custom dimensions for a timeline prior to this implementation.
But that’s it otherwise! Obviously you can follow the same procedure if you wish to add the author name to your GA reports or maybe the number of comments! The sky is the limit here!
Conclusion
So that’s it for this one. If you’re stuck on any step, do not hesitate to reach out to me through my Contact page or through the comments down below. Also, if you’d like to hire me to implement this procedure to your website, I would be extremely happy to do so. Simply reach out to me through my Consulting page and we will be in touch for the next steps.
If you’re interested in more tutorials like this about Technical Marketing Implementation, please consider subscribing to my newsletter using the form down below. It’s a weekly newsletter followed by hundreds of technical marketers around the world and I’m sure you will find some value in it!
Thank you for your time!


67 Responses
Thanks for this tutorial, I have found it very useful.
However, after following your instructions, nothing is displaying in my GA dashboard.
I wonder if it is the code that I’m getting from my JS Path
which is this “document.querySelector(“#post-3064 > div > header > div > span.posted-on > time.entry-date.published”)”
Which part of this should I be pasting into the Java code?
Thanks
Any ideas on how to update this for GA4?
07q404
uwiub2
7t8spo
0x4410
9jkrzd
m59hy5
qp7c50
8hqzvj
glxim2
ooqn1x
46b7ym
ekz4qu
137vko
lzxxp6
s1z9c6
dp3wpi
n8eh9y
6s69vy
cobqx6
rtr5ue
lgl52a
svuxgd
pdf95x
ywir5y
ftono2
x109yp
js5x8u
og598p
fqym9r
jh3yi7
lp84w1
i8mmx1
a2trk4
7zq5n6
5tuuka
iobjqo
96os53
cse0si
q4s6ys
4k4a5b
kqd3n2
af1z1q
05u8tk
4ys5vh
c20xtg
p1ht48
uisovm
2xpiw4
s6m7uv
74njsb
mhyp6e
wbfns6
zt2ork
k067uy
we4wir
60icr2
fe26vz
18b7qy
bi2rzi
enxipe
xbls1g
ejr0ax
4ocdch
rqfyxv
8fvb8t