So this was an interesting project I had to realise for work and I wanted to share it with you now. My current full-time job is at a company called Sweet Spot PR, a Content Marketing/Link-building agency that specialises in creating content that always goes viral and generate organic backlinks from the press. The current term for this kind of strategy is Digital PR and it can be incredibly impactful when the timing of a piece of content is right.
Anyway, one of my tasks is to evaluate the quality of the links our pieces of content are getting. One of the metrics our clients and ourselves are using is Domain Authority, firstly established by Moz a while ago.
While it’s easy to check the Domain Authority of a couple of websites manually, our campaigns are generating tens/hundreds of links every month so I needed to find a way to automate the process of retrieving the DA of a bunch of websites at once. And surely enough, Python is once more an amazing tool for this task.
My original project integrates with Google Sheets which makes it slightly more complex than if we were working with CSVs. For the purpose of this tutorial, we will only work with a list of URLs in a CSV file. If you are interested in getting a Google Sheets integration of this Python notebook for your company, please reach out to me through my Consulting page. If you’re not willing to hire me for this task, it should be pretty straight-forward for any developer to go to the Google Sheets API documentation and build their own DA checker in Google Sheets by piecing up Google’s own documentation and this tutorial.
So without further ado, let’s get into it.
Requirements
First things first, you obviously need to have a good understanding of Python and how to use libraries. The module that is going to do all of the work of checking the DA of the websites we are going to present it is the official Python API for Moz, called Mozscape, available at this address: https://github.com/seomoz/SEOmozAPISamples/tree/master/python
If you want to install it with pip, just copy paste this line of code into your terminal:
pip install git+https://github.com/seomoz/SEOmozAPISamples.git#egg=mozscape&subdirectory=pythonIf you want to follow this tutorial, here is the CSV file that contains a list of 15 domains. Your own file can be a full URL and does not have to only contain the clean domain for you to follow this tutorial. The only thing you need to follow this tutorial is to have your list of domains in the first column of your CSV file.
Get Access to Moz’s API
Now, it all starts with us getting access to Moz’s API in order to retrieve an Access ID and a Secret Key to use in our Python script. The Mozscape API is entirely free for up to 2000 calls per month. Above that amount, you will need to splurge for one of their plans that start at a hefty 250 USD/month for 120,000 calls. I really wish there was a cheaper plan for something like 50,000 calls but unfortunately, there is not at the time of writing this article.
Head over to this URL and click on the “Get connected” button. After having created your account, you should have access to your credentials at this address: https://moz.com/products/mozscape/access
Now that you have your credentials, we can start creating our Python script.
How to get the DA of Websites with Python
Now that we are writing some code, we are going to start things off by importing the modules we are going to use throughout the script. We will be using the native CSV module and the Pandas library to read our sample files and creating the final output. We are also importing Moz’s API which will do the work of getting the Domain Authority of the value we are going to feed it.
Now that we have our modules imported, we can log into Mozscape by using the credentials that have been shared with us in the Mozscape API Access page.
With all of the preliminary work done, it is time to run through our CSV file. I am going to share my whole script underneath and explain then what each line is doing individually.
In Line 1, we are creating a dictionary that will store each domain as a value and each Domain Authority as a key. Eg. : {‘corriere.it’ : ’93’}.
In Line 3 and 4, we are using the CSV module to open our CSV that contains a list of domains in the column A.
In Line 5, we are starting to explain what we want to realise for each row in the CSV file we previously opened.
In Line 7, we are calling Mozscape’s API (Stored under the variable ‘client’ in which we put our credentials) to get the Domain Authority of the value in the first column (row[0]) of the row that is being checked by the loop.
In Line 8, we are creating an entry in the dictionary created in Line 1 that contains the domain name of the original CSV file as a dictionary key and the Domain Authority number found by Mozscape’s API as a dictionary value. Because of the loop, an entry is created for each row of the original CSV file. Eventually, we end up with an entry for each domain presented in the CSV file.
Finally, the Line 10 creates a DataFrame in Pandas from the dictionary we have been filling and converts it into a CSV that will contain all of the data we are interested in. Here is a preview of the content of my CSV after having parsed the sample shared in the “Requirements” part of this tutorial:
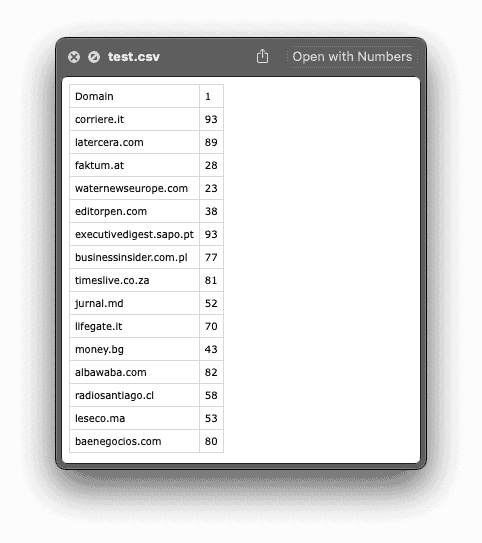
And that is pretty much it. As you can see, the second column is filled with the DA of each of the websites present in the original CSV file. The only thing to be mindful is, as I mentioned earlier, the amount of websites you are checking each month as the Free version of this API only offers you up to 2,000 calls monthly. But at least, these two thousands websites will now be checked automatically on your end instead of having to find a working bulk DA checker website that can only check up to 10 URLs at once and use it over and over :-).
As a reminder, here is how my whole script is looking like:
You obviously want to replace the Line 5 with your own credentials and the Line 9 with the name of your CSV file. You can also choose to change the name of the output file in Line 16 instead of “DA_check_results.csv”.
Conclusion
So that’s it for me and this tutorial. I really hope you found it useful. If you did, I would really appreciate if you could find the time to share this URL around with your peers or maybe consider joining my email list where I share more Marketing technology news, insights and even job postings that get shared with me!
If you have any question or comments, feel free to drop me an email or leave a comment down below and I will try my best to get back to you with an appropriate answer.
Thanks for taking the time to read until here and I wish you a great time ahead! Happy coding!


2 Responses
Hi,
I am getting the following error, when using your script:
Cannot find reference ‘Mozscape’ in ‘imported module mozscape’
I tried to change ‘Mozscape’ to ‘mozscape” throughout the script. But afterwards I am getting an error saying
‘mozscape’ is not callable
Not sure where the problem lies…
Cheers!
H.A.