I have been working in Digital PR for the better part of four years now and one of the metrics our clients are judging us on is how much online coverage we generate for their brands.
We have been responsible for thousands of clippings over the years and something we noticed is how some online outlets sometimes put their own articles offline after a certain amount of time elapsed after the original date of publication.
Outlets like MSN or Yahoo for instance have articles that can expire only one month after publication, which is really confusing to our clients when they look at our reports and can’t find the articles we got them just a few weeks ago.
To pally this problem, I decided to look into a way of automatically generating screenshots of URLs as a way to keep a visual proof in case a client wants to contest a clipping that once existed or simply have a look at it. Enter Python and a fantastic module I just discovered called HTML2Image. While this module is open-source and free, it has its limitations that premium APIs have managed to circumvent. In order to be the most exhaustive possible, I will present you with both options so you can choose which one suits your needs the best.
Let’s get into it.
Requirements (Open-Source Version)
The first thing we are going to need is the Python module HTML2Image. The project page can be found at this address and is very easy to understand and well laid-out. Simply pip install html2image to instantly have access to the module in your Python environment.
The second thing we are going to need is a list of URLs. Here is a CSV containing a few of the clippings we generated for a client recently so that you can follow this tutorial. The goal is going to be to generate a screenshot for each of the URLs present in this CSV.
How to Convert a URL into an Image with Python (Open-Source Version)
The first thing we now need to understand is how this HTML2Image module works.
In essence, it is very simple to use this module. Here is an example of it at work:
Line 1 and Line 3 are just about setting up the module.
Finally, the simple code in Line 5 reaches out to this website’s homepage and saves a screenshot of it under the name “screenshot.png“
Here is the result:
This screenshot was achieved without opening any browser or doing anything else than running the code above.
Now that this is covered, let’s look into querying a CSV file containing multiple URLs and generating screenshots with a decent naming convention so that a human can scheme through them when needed and quickly find what they are looking for.
How to Generate Screenshots of the content from Multiple URLs at once with Python
This is the code I eventually came up with to solve this issue:
This simple sequence will loop through every URL in the first column of the CSV file specific in Line 10 and save a screenshot of the beginning of each URL. Here’s an example for one URL:
There are a few downsides with this method though. The main issue I found with this solution is the scope of the screenshot. As you can see in the example above, the result only encompasses the beginning of the page and nothing else. While this can be enough for some users, in my company’s use case, we really want to be able to see the article we capture in its entirety.
The second downside is how this script is unable to get behind “Accept our cookies” windows. This can unfortunately only be done through some premium APIs and it does not always work either.
The major upside of this method as compared to premium APIs though is its speed. This small script presented above will go through the 40 URLs I prepared in less than two minutes whether as premium APIs not only have rate limits but also typically take at least 10 seconds to fulfil one request.
In order to help you choose which method suits your needs best, I suggest we explore this world of premium APIs now.
How to Save a Screenshot from a Webpage with Python (Premium API Version)
This example is going to use the premium API from Screenshotapi.net . Their API is quite simple to use and even free up to 100 calls/month which might be sufficient enough for you.
The first thing we are going to need is an API token generated when we sign up for an account with their service. Just sign up on their website and you will be provided with such a token.
In terms of features, screenshotapi.net offers some definite improvements over its open-source counterparts. For instance, screenshotapi.net is able to take full-page screenshots. You’re also able to define a height for your screenshots to avoid the timeouts related to some pages that offer infinite scrolling.
Another cool feature of this API is its ability to block ads and cookie walls. While this feature is not working 100% of the time, I found that it was working often enough to mention it. I have also been notified by their Customer Support team that they routinely investigate websites where their tool did not manage to circumvent the cookie walls so that the API eventually manages to go around it. I already shared a list of offending URLs and will be reporting back if I see any difference with those URLs in the future.
Now, let’s look into how to make a call to generate and save a screenshot from any page online with this API:
This sample code allows you to take a full-page screenshot of a single URL and save it locally under the name “local-filename.jpg”.
For some URLs, like the one presented above of the Daily Mail piece of coverage that we got, I found that this API tended to time out and therefore not giving me any result. To counter this issue, I found that limiting the height of the screenshot was the solution as the issue seemed to be that the Daily Mail has infinite scroll enabled on their website. here is the sample code for a 3000px fixed height screenshot export:
Eventually, I wanted to have this API run through the URLs present in my CSV file. Here is the sample code I came up with to complete this task:
The way this code works is that it’s going to try first to do a full page capture. If the full page capture fails for any reason (Time out, …), the script will try to then do a 3000 pixel high page capture and then a 1000 pixel high page capture. If both of these plans do not succeed, you will be let known that the capture for X URL has failed.
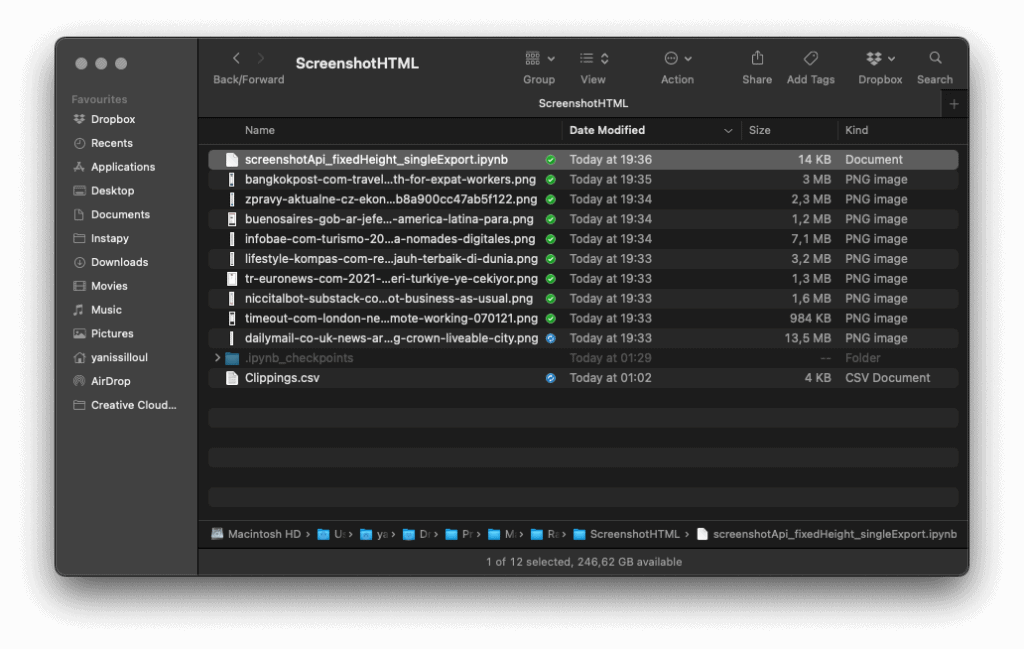
This script is working beautifully for me. Here’s a preview of my folder after having ran it for a few URLs of the CSV I shared previously. Some of those screenshots can get quite heavy but at least I’m sure to not miss anything in the captures.
One of the big downside of this method is the speed of execution. Compared to the open-source version of this process, the premium API is significantly slower at executing the requests. The speed you’re trading off is balanced out by the very significant features like the cookie walls and integrated ad-blockers as well as the full-page capabilities of this API, but the speed might be something to be taken into account.
Conclusion
And that’s it for this tutorial. If you have any question related to this article, do not hesitate to reach out in the comments section down below or send me an email directly through my contact page.


15 Responses
d7xq5e
ber107
bv9b9g
0v2cpz
kaonvx
unh592
x1ev7w
631qvv
k45cxj
5bwvo1
ll3rur
dleg70
jd5ntb
Your blog is a breath of fresh air in the often mundane world of online content. Your unique perspective and engaging writing style never fail to leave a lasting impression. Thank you for sharing your insights with us.
srm8fi