By default, the only required field to start building an email list is the email address of your subscriber. While it can be enough to start sending emails to your community, one of the pillars of Email Marketing is “segmentation”. Segmentation is the process of splitting your subscribers into different target groups in order to deliver them a more targeted message.
For instance, in my case, some of you are following this blog for its Python tutorials while some others have subscribed to my newsletter hoping for more Mautic related content. While this audience can overlap, I believe most of my visitors either care for one or the other. Therefore, I should definitely not promote my Python tutorials to my Mautic audience, and vice-versa. And in order to do that, I need to know from which categories of posts and/or which post exactly my new subscribers are coming from.
After a bit of tinkering, I finally found a way to achieve this and I would like to share it with you guys so you can too begin the process of segmenting your email list and decrease the number of people unsubscribing while supposedly getting a better opening rate as it’s less likely you will send messages some of your followers are not interested in.
By the way, if you are new to EM or are interested in learning more about Email Marketing core’s principles and build your resume with trusted certificates, I also wrote this article about free Email marketing certifications/courses you can take to make sure you know about the do’s and don’t of the field.
Without further ado, let’s get into this article already.
Requirements
In order to follow this article, you will need two things:
- A Mailchimp account already installed.
- Elementor Pro as we are going to use the Elementor Form widget
Not trying to be a shill, but Elementor Pro has completely changed the way I build websites by making it a hundred times easier and faster. This is a great product that is constantly improving.
You can probably use any other form builder out there but the screenshots I am going to use and some of the features that we are going to use may not be a part of the features that the form builder you use has so keep that in mind.
In its essence, the main thing I’m concerned can be missing in other Form Builders is a “hidden” dynamic field. If you know that this is a part of your plugin, then great, if not, you can maybe look for it or ask the developers of your plugin to implement it.
Add a Custom Audience Field in Mailchimp
The first thing we want to do is create a new Audience Field in our Mailchimp Audience Settings.
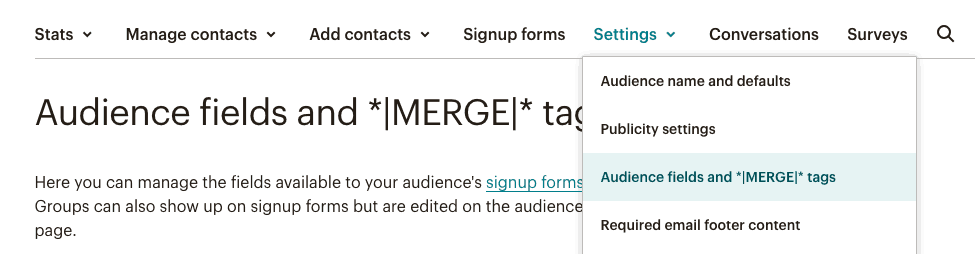
In order to do that, navigate first to the Mailchimp Audience you are interested in adding where the subscribers are from and click on the dropdown menu Settings and then “Audience fields and |MERGE| tags” as shown in the screenshot below:
Once we have reached this page, you will see an “Add a Field” button at the bottom of the page.
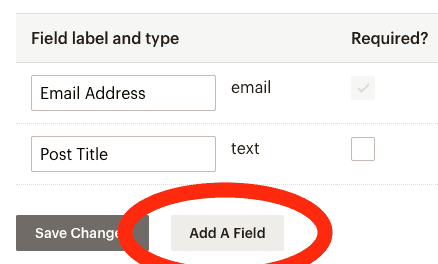
After you have clicked on this button, a second line below the field “Email Address” should have appeared.
This is how I filled mine. The goal for me was to have a column with the title of the post in my Audience tab:

As you can see, I ticked the “Visible” part of the field but I haven’t made it “Required” as some of the forms I use throughout my website are not in articles.
Now that this is done, we can leave Mailchimp and proceed to go in Elementor Forms.
How to Add a Post Title Hidden Field to your Elementor Form
Now that we have a new column in our Audience, we need our forms to have a hidden field that will automatically populate itself with the title of the post when a subscriber submits a form with their email address.
In order to do that, navigate to the Elementor Form you wish to add this functionality and click on Edit with Elementor.
In “Form Fields”, choose to add an item on top of all of the fields you wish your new lead to fill in.
In “Type”, look for “Hidden” and select it.
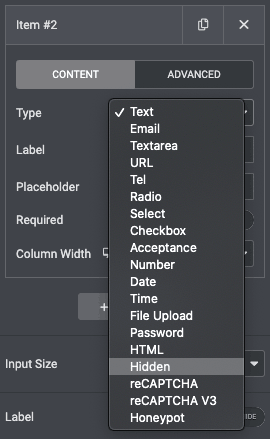
Input a label, like “Post_Title_Field”.
Go to the “Advanced” tab of the field and look for the “Dynamic Tags” icon on the right side of the Default Value cell.
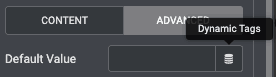
Clicking upon it will give you access to a variety of fields you can choose that will be dynamically changed depending on when/where the user that will submit the form will be.
In our case and because we want to know from which post new subscribers signed up from, I am going to put the Dynamic Tag “Post Title”.
You do not need to change the shortcode/ID of the field.
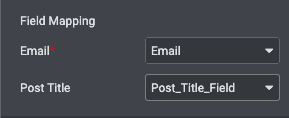
Finally, let’s head to the “Mailchimp” tab of our form, Once everything is loaded, you will notice at the bottom all of the fields available in your Mailchimp audience and to which form field you want to attribute them to.
In our case, we want to attribute the column “Post Title” present in our Mailchimp account to the field that we labelled “Post_Title_Field” earlier.
And that’s it. You can now save your form and apply the same settings to every form you wish to implement the same logic with.
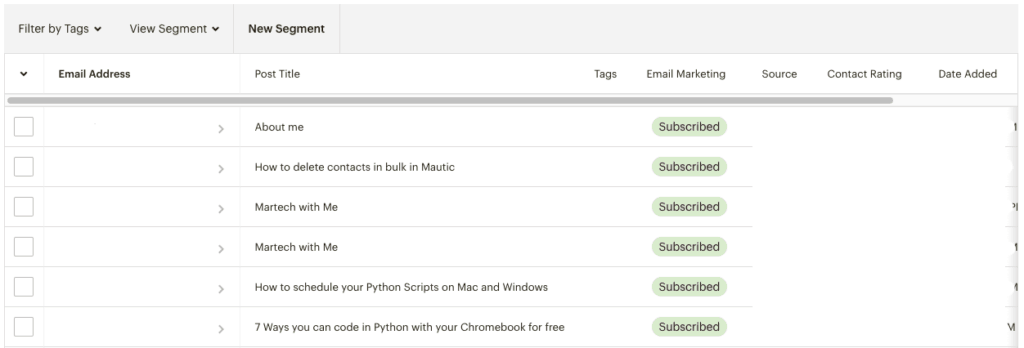
After your new subscribers come in, this is how your audience page on Mailchimp should look like:
Conclusion
And that is pretty much it. Using this method, you can easily track which of your articles are the most successful at bringing new subscribers and eventually send them information that they are interested in.
If you have a question about any of the steps depicted in the tutorial above, don’t hesitate to leave a comment down below in the appropriate section or reach out to me by email 🙂
Hope this helped!