In this
Web-Scraping is a lot of fun and the possibilities it opens should not be underestimated. Research is the future of Content Marketing and as such, having the capability of performing your own research and analysis will definitely open up your perspectives and opportunities.
This serie of tutorials does not come without prerequisite though. You should know the basics of Python before throwing yourself here. If you don’t know where to start, I highly recommend following the free beginner lessons offered by Dataquest.io . It’s free, it worked for me and it will give you the basic understanding that you need to go further here.
If you already know a bit of Python but are not sure whether this will be enough, you only need to know how to create lists, dictionaries, and loops. Knowledge of functions is definitely a bonus. Furthermore, a basic grasp of how HTML works is a plus but not mandatory.
I suggest that you tag along with me, open a Jupyter Notebook and replicate the steps as we’re moving forward together. I believe one can only learn by doing. If you don’t have a Python environment at the ready, you can read my articles that
If you don’t want to stay longer on this page, I also compiled this tutorial in a Jupyter Notebook that you can access through this Google
No more talking. Ready ? Let’s do it.
Import Necessary Libraries
A library is the equivalent of an add-on for Google Sheets but for Python. A library adds functionality to your Python code. There is a library for pretty much everything. Today we want to learn how to use one of the libraries used for web-scraping that is called BeautifulSoup.
For web-scraping, you will need the following libraries :
- Requests (http://docs.python-requests.org/en/master/user/quickstart/#make-a-request)
- BeautifulSoup (https://www.crummy.com/software/BeautifulSoup/bs4/doc/)
Every library is different and has
The code below shows you how to import a library to your current environment. In other words, importing a library is teaching your Python
If your environment does not have BeautifulSoup installed, open up your terminal, type this up and run your code again:
pip install beautifulsoup4Getting the content of a page
Now that your Python code knows how to web-scrape, we want to get ready. One of the common problems faced by scrapers is that websites will recognize them as robots. To counter that, we use “headers”. “Headers” are a way for the robot to disguise itself and look like a real computer.
The code below shows how to create a header.
The second thing we want to input is the url we want to extract data from. For the purpose of this tutorial, we will look into extracting the cost of a macbook Pro from Apple’s website.
Extracting Data from a page
Now that we have our url and that Python speaks the right language, it is time to call the libraries and get the code of this webpage.
- The first thing we want to do to achieve that is doing a request. Meaning calling the URL we gave to see if it exists or not.
- Then we want to extract the content out of it
- Finally, we want to give all of this content to BeautifulSoup, which is the library that is going to give us the power to look into the content of the page and do stuff with it
The variable “soup” now contains all of the code of the webpage. If you’re familiar with HTML/CSS, the soup is basically the source code of the page.
So now that we have the content. We can basically interact with it and look for specific things.
The way content works in HTML is that everything is in tags like “<p>Content</p>“. Everything between these tags can be extracted.
Usually, tags like this also contains class or ids.
To look for content, we need to inspiect the webpage we’re looking to extract the data of.
- Right click on thelement of the page you want to extract
- Click “Inspect”
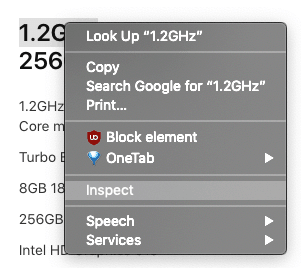
This will bring a panel in your window with the code that contains the element you inspected. In this case we want to extract the “title” of the computer. The code looks like this :

Now, we know that we’re looking to extract the text that is inside the “h3” tag and has a class named “as-macbundle-modelvariationtitle”
The code to find elements is as follow :
need to find a way to show results inside the gist ?
As you can notice, the variable “find_text” now contains the exact text that we were inspecting.
Using the same method, we can now look for the price of this laptop.
By right-click -> Inspect on the price in the wbepage, we find out that the price of the laptop is in the content of this tag
<span class="as-price-currentprice" data-autom="price-MNYF2">
        <span>
            $1,299.00
        </span>
</span>
There is two ways to find this specific price :
Also, all of this code does not actually have to be in so many lines. You can get the same content in one line like this :
Summary
This wraps up this introduction on how to get data from a webpage.
In the next article, we will learn how to apply this in conjunction with loops in order to go through a big amount of data and automating its retrieving.
The goal there will be to scrape an entire table from a
If you liked this tutorial and want to see more of it, I’ll link the second part here as soon as it’s published but you can definitely subscribe to my newsletter where I’ll be sure to mention the release of the subsequent articles as soon as they come out.
If you have any question, feel free to leave a reply below and I’ll get back to you as soon as I can to sort this out1
As always, I hope you learned something new today, and thank you for your time.

One Response